photo greener grass logo new_zpsew0enxyv.png  photo stitches copy_zpsp3oydyai.png

 photo about_zpshba0art5.png  photo shop_zps24sfyl5o.png  photo workshops_zpsycwnndbh.png  photo craft parties_zps5jskxbkf.png  photo tutorials_zpscfm8kqak.png  photo contact_zpsfhv565sj.png
Showing posts with label garden. Show all posts

A Peck of Peppers


Check out all of these Green Bell Peppers and Jalapenos that came out of our garden yesterday. And there are still p-lenty still growing on the plants. The peppers are about the only thing left in the garden at this point of the summer. In just a few weeks it will be time to start thinking about a fall crop. I'm especially excited about planting some pumpkins this year!

With all of these peppers ready, now is a perfect time to make Pepper Jelly.


I'll also use a few of the jalapenos to make Pioneer Woman's Salsa, which is oh-so-good.

Do you have any good pepper recipes? I'm going to need some new ways to use these!
mel

Tour de Garden

Do you remember my teeny tiny little seeds that were started in a mini-greenhouse?


Yeah, those little guys.

Well, they grew and now they are out in the big garden. Last year, we had so much fun with our one little raised vegetable bed that this year we decided to expand to 3 beds. We needed more room for all of the plants that we wanted to grow!

gardengrows1

In the first bed we have cucumbers growing on these little DIY trellises. I got the idea from Southern Living a few months ago-- upside down tomato cages tied with bamboo stakes. (Black dog optional.)

gardengrows3

In that same bed, we're growing bell peppers and jalapeno peppers.
Oh, the salsa that I'm going to make with those jalapenos...so mucho salsa.

gardengrows6

We're also growing broccoli...

gardengrows5

and lettuce! Yum.

gardengrows4

In the next bed, we have two variety of tomatoes, squash, and zucchini.

gardengrows2

Hello, little baby.

IMG_0132

The third bed, is where things get really interesting. Here we are growing onions and potatoes.The onions are not doing so great. Of all the things in the garden, these look the worst. I hope that we will be able to eat one little lone onion from our garden, though. Cross your fingers.

gardengrows9

And here's the reason why the onions are so sad:
Somehow we have managed to grow freakishly large potato plants.
They are huge-mungus.
They are taking over the garden.
We had  to tie them up with stakes, which is oh-so-not-normal for taters.
Take a gander at these.

gardengrows8

To give you a point of reference, Paper Dave hopped into the garden. He's such a good sport.

gardengrows10

Paper Dave is concerned about their growth rate.
I'm optimistic that I'll have prize winning potatoes.
I'm blue ribbon bound, baby.

All of these plants are really easy to grow, even for first time gardeners. You could even plant one tomato or squash plant in a container on your deck, if that's all the room you have. Good soil, sunshine, and lots of water is all you need for a happy, healthy plant that you'll enjoy eating from all season.

The only hard part is being patient and waiting for your tomatoes to ripen.
mel

Window Box Herb Garden 2011

Last year, we enjoyed our herb garden more than nearly anything else we planted.

This year, we decided that if a few herbs were good then more would certainly be better.
We need MORE basil! MORE parsley! More cilantro!
We are greedy herb-eaters.
 So we expanded.
Without further adieu, here is the Dark Family 2010 Herb Garden.

herbgarden5

First off, we have a little oregano...yummy in Italian dishes. The oregano shares a home with some chives that survived from last year. They braved the winter and lived to tell about it. [Insert Brittney Spears, "Stronger"]

herbgarden3

Chives have beautiful purple flowers that smell amazing!

herbgarden4

Living next door, we have parsley and cilantro which we grew from seeds in our greenhouse. They started out so teeny tiny...it's hard to believe how much they've grown.

(Also, if you look closely to the right of those plants, you can see where Jack has beat the H-E-double-hockey-sticks out of our newly painted deck railing by jumping up on it to bark at passing joggers and their pesky little dogs.)

herbgarden2

This is David's favorite. We have a whole planter box full of basil (that we also started from seeds). David asks me everyday if I think we are growing enough. He's extremely worried about the imminent threat of a basil shortage...as we all should be.

herbgarden1

And lastly here's the rosemary and thyme. The thyme is a new plant, but the rosemary is also a winter survivor. [Insert Beyonce's "Survivor"].

A lot of these herbs are still a little too small to use much, but we have high hopes that in a few weeks they'll be ready-for-the-cooking.

Here's a recipe that we've dipped into the herb garden for a few times this season already:

***Herbed Chicken***
Ingredients
  • 3 tablespoons extra-virgin olive oil
  • 2 tablespoons minced shallots (I use onions)
  • 1 tablespoon chopped fresh rosemary
  • 2 teaspoons chopped fresh thyme
  • 2 garlic cloves, minced
  • 4 (6-ounce) skinless, boneless chicken breast halves
  • 1/2 teaspoon salt
  • 1/4 teaspoon black pepper
  • Cooking spray
Combine olive oil, minced shallots, rosemary, thyme, and minced garlic in a zip-top plastic bag. Add chicken breast halves. Marinate in the refrigerator 2 hours. Remove chicken from bag; sprinkle with salt and pepper. Brush the herb mixture evenly over chicken. Heat a grill pan over medium-high heat. Coat pan with cooking spray. Add chicken to pan; cook for 6 minutes on each side or until done. (We cook ours on our outdoor grill and it is SO yummy!)

(Recipe from Cooking Light)

Do you have a herb garden? What are you growing?
mel

Get Your Grow On, Part 2

Hey there friends.

You didn't know this was going to be a series, did you? Boo-yah.

We're about to head out the to root on the Mercer Bears against Belmont in the A Sun Tournament Semi-Finals. (Go Bears!!) But before we do, I wanted to show you the little addition to our backyard this year. This past summer I blogged about how we built our raised vegetable bed and what we grew in it. With that success under our belt, this year we are expanding to 3 raised vegetable beds...all the better to grow with, my dears.

We already have one built and planted with a cold weather crop...spring onions and red potatoes.


Here's what we did, in case you're interested. First we built the raised beds, loosely using these instructions and some recycled lumber that we happen to have laying around. Next we lined the bed with garden plastic to keep the weeds out. You could also use newspaper for this step. Or you could skip the weed barrier entirely and fight the weeds face to face like a real man.


Then we filled up the bed with a gazillion bags of topsoil.


Followed by a few bags of Black Kow (manure. yuck.) to enrich the soil.


Then we sprinkled the dirt with a heavy dose of slow release fertilizer, like Osmocote.


Then we mixed it up a bit a shovel and called it good enough.

When we had the raised bed finished, we planted some 'taters.


And some Un-yuns.


We put a little fence around our bed to keep the locals out.


This guy has a record.


Grow in Peace.
mel

Get Your Grow On

We've got Spring Fever. In a big way.
I'm in a gardening frenzy. I could easily unload my whole paycheck at the garden center. 
But I won't because I like to eat.

Since it's still early in the season, and the threat of frost is still looming over us here in Central Georgia, we're playing it safe and not planting too much outside yet. I am, however, getting a jump start on the gardening season by starting some seeds indoors.

I've been eyeballing these mini-greenhouses for a while. You can plant seeds in anything (I was planning on using some special seed starting soil and empty egg cartons for mine) but I picked up the Jiffy Greenhouse at Lowe's for several reasons. It was pretty inexpensive, and  at about $7 the greenhouse cost less than a small bag of seed starter soil. The container can be used over and over again because Jiffy sells refill soil pellets. I also liked the fact that the greenhouse is self-contained and can easily be moved around if it's in the way. Moving this little greenhouse will be much easier than moving 10 egg cartons full of dirt, yes?

Absolutely.

Truth be told, I really dig the fact that it's called a "Professional Greenhouse." I am now referring to myself as a Professional Gardener. I mean...I have a Professional Greenhouse for Pete's sake.


The Jiffy Greenhouse is super easy to use. Each of these little pellets is a pod of special soil for planting seeds. My greenhouse contained 72 pods, but they have smaller greenhouses with fewer. When you open it up, here's what they look like:


The instructions say to gradually add 1/8 cup of water to each pellet or, for my 72 pellet greenhouse, about 10 1/2 cups total.

I used my scratched-up measuring cup to ensure accuracy. Professionals are all about accuracy.


Adding the water is really fun, because the pellets grow! Here's what they looked like after I added about 4 cups of water:


And here they are after 8 cups of water. Don't give up on them! They will get bigger. It's not instant, but it's pretty fast. I'm sure your kids would like this project...I kept calling David inside from mowing the grass to check it out.


After 10ish cups of water (there's that Professional accuracy) they will be full grown planting pods. All you have to do now is to slightly loosen the mesh at the top of the pod and plant your seeds.

Seeds are not included with the greenhouse. The seeds that you buy will have helpful instructions on the back. Plant your seeds in the pods according to the directions on your seed packet.


These are squash seeds. My seed packet instructions said that they should be planted 2 per hole and 1/4 inch deep. And that is what I did.


Because I was planting several different types of seeds in my greenhouse, I used painters tape to identify what is planted in each row. I put the name of the plant and the date the seeds were planted. The dates will be helpful as I move baby plants to the garden and plant more seeds in the greenhouse. I'll be able to keep up with what's new in the greenhouse and how long it's been there by looking at the date it was planted.


Here's the whole greenhouse planted and put together. We planted Zinnias, Mint, Cilantro, Basil, Parsley, Cucumbers, Green Peppers, Squash, and Zucchini.

Greenhouse, professional variety.

And here she sits in my window. It's like a mini-maternity ward.


The greenhouse is satisfying my need to plant and will save us big dollars down the line because seeds are much less expensive than buying plants for our garden. I'll still buy a few plants later on, but this is a good start.

Go get some seeds and get your hands dirty!
Melissa Dark
Professional Greenhouse Manager


Sharing with friends at:

Flower Formula

Yesterday, I tackled a little project after work.
I thought you might be interested.
You may not be.
That's a chance I'm willing to take.

I have been dissatisfied with these planter boxes for quite some time now. Like a year.


These big uglies came with the house. They were undoubtedly built especially to flank our backyard steps. They had potential to be nice and I tried sprucing them up by cleaning and painting them. The mission was unsuccessful. Obviously. They always look yucky from the dirt seeping out between the boards and splashing up off the ground. I guess that's what happens when you fill something with dirt and sit in on the dirt. White is maybe not the best color choice for a planter.

I'd been looking for some big pots to replace them for a long time, but large pots are really expensive. I needed two very large pots...forget about it.

So every time I go to Lowe's or Wal-Mart I wander through the garden center, just to see if there are any awesome sales.

When I was in Fitzgerald last week, I found just such a sale. Well, Mama found it, and she took me there.


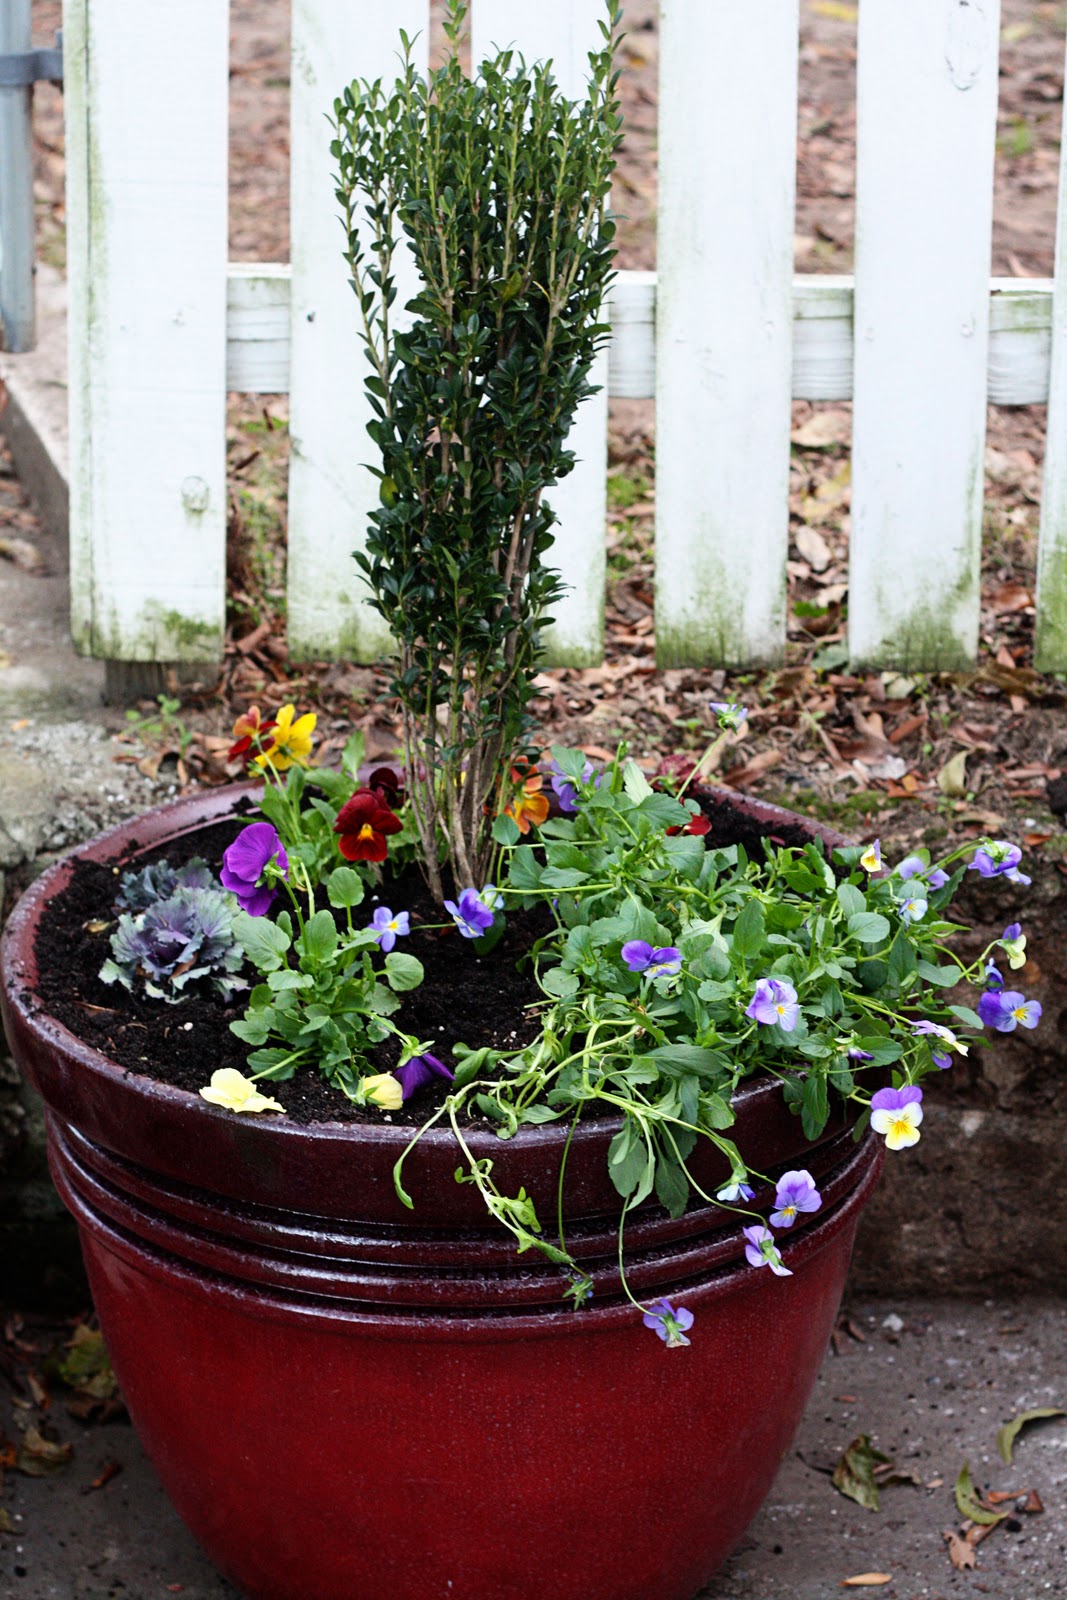
I got these big giant red planters. They are made of resin, so they are lightweight and durable, but they look like glazed pottery. They were on clearance. Thank you Better Homes and Gardens via Wal-Mart. My home and garden are better because of you.

I keep finding humongous red stuff that I need to purchase when I go to Fitzgerald. What gives?

David moved the old planters out of the way and filled the new pots up with dirt, without me even asking. Thanks, Dave-O. Yesterday I went and picked up some plants to fill 'em up.

Check me out. Getting my garden on in my dress clothes. What, you don't garden in a dress? I was losing daylight and just had to roll with it.

Please ignore my funky hair. Thank you.

I'd like to show you my formula for filling big planters. Yes, it's a formula. I use it in all my large containers. Like these on the front steps.


Are you ready for this? Are you ready for the amazing planting formula?

OK, here it is. Plant something big and tall in the middle and something small and colorful around it.

Pretty good, huh? This is why you're reading the blog. Because I'm so full of useful information. Right?

But wait, there's more. Here's what you do.

Step 1: Choose your plants.

Choose a tall shrub that is at least as tall as the pot that you will be planting it in. The shrub will be the permanent fixture in the pot and then we can plant seasonal things around it for color. This way, you save money by not having to change every plant in the pot each season. Thrifty. It also adds height to your arrangement for visual interest.

I chose a Sky Pencil Japanese Holly for my tall shrub.

You also need colorful plants to go around the base of the shrub. I usually use just one type of plant, but since this pot is so big, I decided to use a few.

I chose Pansies for color. In a smaller pot, I would just go with Pansies. They love the cold and will be pretty all winter.


I also picked up some Violas, because they are a trailing plant, which means they will grow long stems that hang over the side of the pot. I love that.


I also mixed it up with some ornamental cabbages to add contrast and fullness.


Tip: I buy all of my plants in the smallest size that the garden center sells. By buying baby plants I save a lot of money and in two weeks they will be just as big as their older brothers that I would have had to pay double for. If you can have a tiny bit of patience, you can save a lot of money.

Step 2: Arrange your plants in the pot.

Try different ways to see what looks best. If you are making two pots, like I did here, make sure both pots are arranged the same. It's easier on the eyes. I also always put the big plant in the middle and the most interesting plants (in this case the trailing Violas) near the front.

Here's my little mock-up arrangement.


Step 3: Plant!

Here's the fun part. Take all of your plant out of their little containers and plant them in your big pot. You'll find that most of the plants will have their roots tightly bound together from growing in a pot that is too small. Gently separate the roots before you plant them in their new home. They will be so happy to be free from their life in a superstore tiny pot that they will love you forever. They will repay you by growing fast and strong.

Feel good about yourself. You are a plant liberator!

Lady is extremely interested in the planting formula. She is my best student.


However, she suddenly lost interest when David offered to take them to the park. I can't compete with that.


Eager souls.

Here's the finished product:


Remember the plants are just babies right now, but they will fill up the pot within a few weeks. Patience, grasshopper. Patience. It's going to look great!

Are you working on any fall/winter gardening projects? I'd love to hear about them. Maybe you want to tackle one now, because you have my ultra-awesome formula?

Tall Shrub + Seasonal Plants with Color = Garden Delight
Mel


Sharing this project with friends at:
Somewhat Simple
A Crafty Soiree
Tip Junkie
Just a Girl
Remodelaholic
Between Naps on the Porch
Skip to my Lou

Outside My Window...

Hi friends.

I've been out of of town for 5 days and just returned today. My trip was so much fun and I can't wait to tell you all about it, but I have to say that I am very glad to be home. I missed the Dave and the dogs.

When I got home today, I was so suprised to see all the comments from you guys on Facebook and here on the blog. Thanks, everyone, for reading. Its nice to feel connected with you. You're nice people and I'm proud to know ya. Let me know how your granola turns out!
In other news, look what's growing outside my kitchen window...


It makes washing dishes almost enjoyable. I'm excited that fall, and some cooler weather, is on its way, but it won't be long until I'll miss all the bright green trees, the blue sky, and the mounds of flowers around our house. They'll be back, though. I love that seasons give us something to look forward to, don't you?

It's good to be home.
Melissa

Window Box Herb Garden and Basil Pasta

Last week I told you about our "garden spot" and all its successes and failures. Now let's take a look at the window box herb garden on the deck.  I wanted to plant the herbs in a location close enough to the kitchen that I could just walk out the door and get what I needed. I also wanted them to be high enough off the ground so that they would be safe from Jack, who has quite the reputation with plants around these parts.

Thus, the window box herb garden was born. It is actually not in a window, but hangs off the side of our deck, using metal-window-box-holder-brackets (I have no idea what they were actually called and I can't find them online) that we got at Lowe's early in the summer.You simply hang the brackets on your deck railing and then insert your window box containers. We used plain plastic planter boxes that are a lovely fake terracotta orange. Plastic pots may not be the prettiest, but they were inexpensive and were really the most functional option for this little project. We needed something that was lightweight and that would hold a reservoir of water for our thirsty plants in the sweltering heat. I actually really liked the way they turned out  in the end.
 
The window box herb garden contains thyme, oregano, chives, cilantro, parsley, basil, and rosemary. It smells wonderful. You would like to come sit on the deck and smell the herbs...I'm sure you would. I do.

Herbs typically require full sun but next year, I think I will grow my parsley and cilantro in a shadier place and grow more than one plant. They grew pretty well, but I think they got a little too much sun or we may have clipped them too rigorously...we love parsley and cilantro.


It is so much fun to have all of these great herbs right outside my back door. I add them to everything, omelets, marinades, pastas, etc. There have been few dishes that have come out of my kitchen un-herbed since we planted these.

When we were up to our ears in basil this summer, we used it to make Basil Pasta. Not pasta with a basil sauce, but pasta made out of basil...crazy. I happen to be in possession of a pasta maker attachment for my beloved Kitchen-Aid mixer. My main man David gave it to me for Christmas. I think he may have had some ulterior motives, but I love it none-the-less. Homemade pasta is delicious. It will change your life. Let me show you how it's done.

First, I made my pasta dough in the food processor. Easy peasy. I used a  recipe from Allrecipes.com which is an great resource when you are looking for a something specific, say if you have a heap of basil and a pasta maker attachment you're itching to use.  The site is a Southern Living affiliate, so you can trust them with your whole heart.


Basil Pasta for Two
3/4 cup chopped fresh basil
1 1/2 cups all-purpose flour
1 egg
1 teaspoon olive oil
2 tablespoons water
2 1/2 tablespoons all-purpose flour
 
Using a food processor, process basil leaves until chopped very fine. Add 1 1/2 cups of flour and pulse two or three times, or until combined. Add egg, 1 teaspoon oil, and the water until dough forms a ball shape. If dough seems dry, add a bit more water. Wrap dough in a piece of plastic wrap which has been coated in a few drops of olive oil. Refrigerate dough for 2 hours.

Now comes the fun part! David loves to be my pasta machine assistant. Look at him work...


Take the dough out of the fridge and run it through your pasta machine. It is basically just like the little play-dough pasta press you played with when you were little. Except you can eat your results. Without getting in trouble.

If you do not have a husband that buys you kitchen gadgetry, you can also roll the dough out very thin and use a knife or pizza cutter to make fettuccine noodles. Still delicious, just not as much fun.

I try to let my pasta dry for about 30 minutes to an hour before I boil it. Sometimes I am too hungry to wait.

Boil the pasta  in salted water until it is tender. David, my pasta assistant, likes to test the done-ness of pasta by flinging the noodles onto my kitchen cabinets...if they stick they are done, if they fall down, then you need to keep on cookin'.

Use these basil noodles with a tomato or cream sauce...delicious!

I can turn anything into a carbohydrate,
Melissa

Blogging tips